Deploying a scanner from the AMI Catalog
AWS Appliance Deployment Guide
Guide for deploying CyberOptix appliances in Amazon Web Services.
Overview
CyberOptix appliances are pre-configured scanner instances available as Amazon Machine Images (AMI) in the AWS Marketplace. Deploying an appliance in AWS provides a quick way to add scanning capacity in cloud environments.
Deployment Options:
| Method | Best For | Configuration |
|---|---|---|
| Manual (Console) | Quick setup, learning | Manual post-deployment |
| Terraform | Infrastructure as code, GitOps | Automated via SSM or parameters |
| CloudFormation | AWS-native IaC, StackSets | Automated via SSM or parameters |
Prerequisites
- AWS account with EC2 launch permissions
- VPC and subnet configured (private subnet with NAT gateway recommended)
- Security group allowing outbound HTTPS (443)
- SSH key pair for instance access (optional)
- CyberOptix account with:
- Scanner group created
- Organization ID
- License key from [email protected]
Deploy Appliance (Manual)
Step 1: Find CyberOptix AMI
- Navigate to EC2 → Launch Instance
- Click Application and OS Images (Amazon Machine Image)
- Select Community AMIs tab
- Search for:
optix-appliance
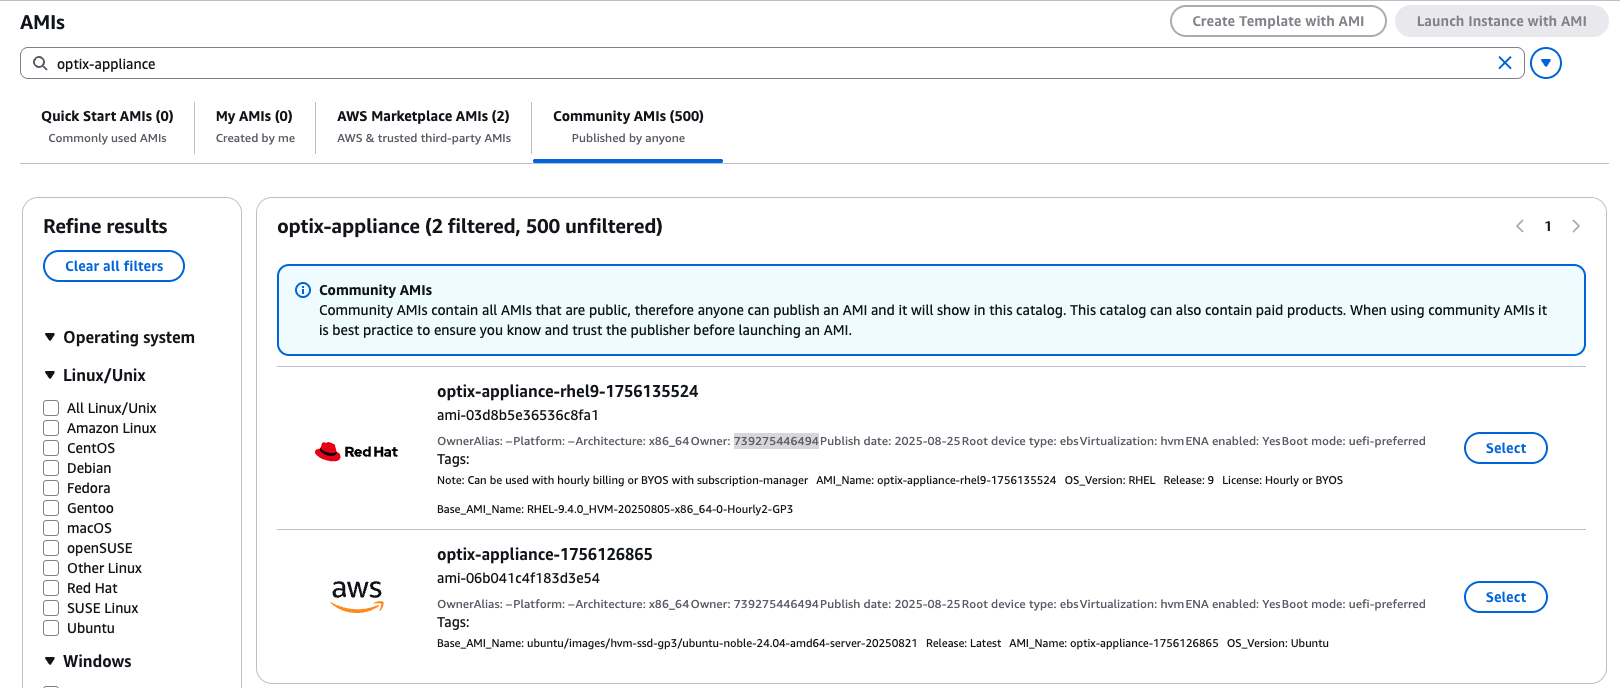
Step 2: Verify AMI Publisher
Confirm the AMI is published by Purple Team Software:
Owner ID: 739275446494
Security Note: Only use AMIs published by this verified owner ID to ensure authenticity.
Step 3: Launch Instance
- Click Select → Launch instance with AMI
- Configure instance settings:
| Setting | Recommended Value | Minimum Value |
|---|---|---|
| Instance Type | t3.xlarge (4 vCPU, 16 GB RAM) | t3.large (2 vCPU, 8 GB RAM) |
| Storage | 120 GB gp3 | 100 GB gp3 |
| Network | VPC with internet gateway | VPC with NAT gateway |
| Security Group | Allow outbound 443 | Allow outbound 443 |
- Select your SSH key pair
- Click Launch instance
Step 4: Access Appliance
Connect to the appliance via SSH using the appropriate default username:
Ubuntu 24.04-based appliances:
ssh -i your-key.pem ubuntu@<instance-public-ip>Red Hat 9-based appliances:
ssh -i your-key.pem ec2-user@<instance-public-ip>Deploy with Terraform
Use Terraform for automated, repeatable deployments with infrastructure as code.
Prerequisites
- Terraform >= 1.0
- AWS CLI configured with credentials
Quick Start
1. Create a directory for your Terraform configuration:
mkdir cyberoptix-scanner && cd cyberoptix-scanner2. Create SSM Parameters (Recommended):
Store scanner configuration securely in AWS Systems Manager Parameter Store:
aws ssm put-parameter \
  --name "/cyberoptix/scanner/api_url" \
  --value "https://mycompany-api.cyberoptix.io" \
  --type SecureString

aws ssm put-parameter \
  --name "/cyberoptix/scanner/scanner_group_id" \
  --value "your-scanner-group-uuid" \
  --type SecureString

aws ssm put-parameter \
  --name "/cyberoptix/scanner/organization_id" \
  --value "your-organization-uuid" \
  --type SecureString

aws ssm put-parameter \
  --name "/cyberoptix/scanner/license_key" \
  --value "your-license-key" \
  --type SecureString
3. Create the Terraform files:
Copy the Terraform code from the sections below into separate files in your directory.
4. Create your variables file:
# Create terraform.tfvars with your values
cat > terraform.tfvars << 'EOF'
vpc_id     = "vpc-xxxxxxxxxxxxxxxxx"
subnet_id  = "subnet-xxxxxxxxxxxxxxxxx"
ssm_prefix = "/cyberoptix/scanner"
EOF
5. Deploy:
terraform init
terraform plan
terraform apply
Terraform Configuration Files
Create each of the following files in your Terraform directory:
main.tf
# CyberOptix Scanner - AWS Terraform Deployment
# This module deploys CyberOptix scanner instances from pre-built AMIs

terraform {
  required_version = ">= 1.0"

  required_providers {
    aws = {
      source  = "hashicorp/aws"
      version = ">= 4.0"
    }
  }
}

provider "aws" {
  region = var.aws_region

  default_tags {
    tags = {
      Application = "CyberOptix Scanner"
      ManagedBy   = "Terraform"
    }
  }
}

# Look up the latest CyberOptix Scanner AMI
data "aws_ami" "scanner" {
  most_recent = true
  owners      = ["739275446494"] # Purple Team Software

  filter {
    name   = "name"
    values = ["optix-appliance-${var.platform}-*"]
  }

  filter {
    name   = "state"
    values = ["available"]
  }
}

# Get current AWS region for ARN construction
data "aws_region" "current" {}

# Get current AWS account ID for ARN construction
data "aws_caller_identity" "current" {}
variables.tf
# CyberOptix Scanner - Terraform Variables

# =============================================================================
# Required Variables
# =============================================================================

variable "vpc_id" {
  description = "VPC ID where the scanner will be deployed"
  type        = string

  validation {
    condition     = can(regex("^vpc-[a-z0-9]+$", var.vpc_id))
    error_message = "VPC ID must be a valid AWS VPC ID (e.g., vpc-12345678)."
  }
}

variable "subnet_id" {
  description = "Subnet ID for the scanner instance (private subnet with NAT gateway recommended)"
  type        = string

  validation {
    condition     = can(regex("^subnet-[a-z0-9]+$", var.subnet_id))
    error_message = "Subnet ID must be a valid AWS subnet ID (e.g., subnet-12345678)."
  }
}

# =============================================================================
# Scanner Configuration - Option A: SSM Parameter Store (Recommended)
# =============================================================================

variable "ssm_prefix" {
  description = "SSM Parameter Store prefix for scanner configuration (e.g., /cyberoptix/scanner). If set, scanner config will be fetched from SSM."
  type        = string
  default     = ""
}

# =============================================================================
# Scanner Configuration - Option B: Direct Parameters
# =============================================================================

variable "api_url" {
  description = "CyberOptix API URL (e.g., https://mycompany-api.cyberoptix.io). Required if ssm_prefix is not set."
  type        = string
  default     = ""
  sensitive   = false
}

variable "scanner_group_id" {
  description = "Scanner group UUID from CyberOptix. Required if ssm_prefix is not set."
  type        = string
  default     = ""
  sensitive   = false
}

variable "organization_id" {
  description = "Organization UUID from CyberOptix. Required if ssm_prefix is not set."
  type        = string
  default     = ""
  sensitive   = false
}

variable "license_key" {
  description = "License key for vulnerability test synchronization. Required if ssm_prefix is not set."
  type        = string
  default     = ""
  sensitive   = true
}

# =============================================================================
# Instance Configuration
# =============================================================================

variable "aws_region" {
  description = "AWS region for deployment"
  type        = string
  default     = "us-east-1"
}

variable "platform" {
  description = "Scanner AMI platform: 'ubuntu' (Ubuntu 24.04) or 'rhel' (RHEL 9)"
  type        = string
  default     = "ubuntu"

  validation {
    condition     = contains(["ubuntu", "rhel"], var.platform)
    error_message = "Platform must be either 'ubuntu' or 'rhel'."
  }
}

variable "instance_type" {
  description = "EC2 instance type. Recommended: t3.xlarge (4 vCPU, 16GB). Minimum: t3.large (2 vCPU, 8GB)"
  type        = string
  default     = "t3.xlarge"
}

variable "root_volume_size" {
  description = "Root EBS volume size in GB"
  type        = number
  default     = 120

  validation {
    condition     = var.root_volume_size >= 100
    error_message = "Root volume size must be at least 100 GB."
  }
}

variable "instance_count" {
  description = "Number of scanner instances to deploy"
  type        = number
  default     = 1

  validation {
    condition     = var.instance_count >= 1 && var.instance_count <= 10
    error_message = "Instance count must be between 1 and 10."
  }
}

variable "key_name" {
  description = "EC2 key pair name for SSH access. Optional - leave empty to disable SSH key-based access."
  type        = string
  default     = ""
}

# =============================================================================
# Naming and Tags
# =============================================================================

variable "scanner_name" {
  description = "Name prefix for scanner resources"
  type        = string
  default     = "cyberoptix-scanner"
}

variable "environment" {
  description = "Environment name (e.g., production, staging, development)"
  type        = string
  default     = "production"
}

variable "additional_tags" {
  description = "Additional tags to apply to all resources"
  type        = map(string)
  default     = {}
}

# =============================================================================
# Network Security
# =============================================================================

variable "allowed_ssh_cidrs" {
  description = "List of CIDR blocks allowed SSH access to the scanner. Leave empty to disable SSH access."
  type        = list(string)
  default     = []
}

variable "enable_full_port_scanning" {
  description = "Enable outbound access to all ports (1-65535) for comprehensive scanning. If false, only common ports are allowed."
  type        = bool
  default     = false
}
security-groups.tf
# CyberOptix Scanner - Security Group Configuration

resource "aws_security_group" "scanner" {
  name_prefix = "${var.scanner_name}-"
  description = "Security group for CyberOptix Scanner"
  vpc_id      = var.vpc_id

  tags = merge(var.additional_tags, {
    Name = "${var.scanner_name}-sg"
  })

  lifecycle {
    create_before_destroy = true
  }
}

# =============================================================================
# Outbound Rules - Required for Scanner Operation
# =============================================================================
# Note: AWS Security Groups cannot use DNS names, only CIDR blocks.
# Using 0.0.0.0/0 because service IPs may change. For stricter security,
# resolve these hostnames and create rules with specific IPs (requires updates).
#
# Required destinations:
#   - rsync.purpleteamsoftware.com:873 (vulnerability test sync)
#   - identity.purpleteamsoftware.com:8443 (authentication)
#   - app.cyberoptix.io:443 (platform UI) or custom domain
#   - app-api.cyberoptix.io:443 (API) or custom domain
#   - apt.purpleteamsoftware.com:80/443 (Ubuntu package updates)
#   - dnf.purpleteamsoftware.com:80/443 (RHEL package updates)
#   - archive.ubuntu.com:80/443, cdn.redhat.com:80/443 (OS updates)
#   - github.com:443 (package dependencies)
#   - hub.docker.com:443, ghcr.io:443 (Docker images)
# =============================================================================

# HTTPS - CyberOptix platform, API, Docker registry, GitHub, package repos
# Destinations: app.cyberoptix.io, app-api.cyberoptix.io, hub.docker.com,
#               ghcr.io, github.com, apt/dnf.purpleteamsoftware.com
resource "aws_vpc_security_group_egress_rule" "https" {
  security_group_id = aws_security_group.scanner.id
  description       = "HTTPS - CyberOptix platform, Docker registry, updates"
  ip_protocol       = "tcp"
  from_port         = 443
  to_port           = 443
  cidr_ipv4         = "0.0.0.0/0"

  tags = {
    Name = "${var.scanner_name}-egress-https"
  }
}

# HTTP - Package updates (Ubuntu/RHEL repos, Purple Team Software repos)
# Destinations: archive.ubuntu.com, cdn.redhat.com, apt/dnf.purpleteamsoftware.com
resource "aws_vpc_security_group_egress_rule" "http" {
  security_group_id = aws_security_group.scanner.id
  description       = "HTTP - OS and scanner package updates"
  ip_protocol       = "tcp"
  from_port         = 80
  to_port           = 80
  cidr_ipv4         = "0.0.0.0/0"

  tags = {
    Name = "${var.scanner_name}-egress-http"
  }
}

# Rsync - Vulnerability test synchronization
# Destination: rsync.purpleteamsoftware.com
resource "aws_vpc_security_group_egress_rule" "rsync" {
  security_group_id = aws_security_group.scanner.id
  description       = "Rsync - rsync.purpleteamsoftware.com vulnerability test sync"
  ip_protocol       = "tcp"
  from_port         = 873
  to_port           = 873
  cidr_ipv4         = "0.0.0.0/0"

  tags = {
    Name = "${var.scanner_name}-egress-rsync"
  }
}

# Authentication service
# Destination: identity.purpleteamsoftware.com
resource "aws_vpc_security_group_egress_rule" "identity" {
  security_group_id = aws_security_group.scanner.id
  description       = "HTTPS 8443 - identity.purpleteamsoftware.com authentication"
  ip_protocol       = "tcp"
  from_port         = 8443
  to_port           = 8443
  cidr_ipv4         = "0.0.0.0/0"

  tags = {
    Name = "${var.scanner_name}-egress-identity"
  }
}

# DNS - Required for name resolution
resource "aws_vpc_security_group_egress_rule" "dns_udp" {
  security_group_id = aws_security_group.scanner.id
  description       = "DNS UDP"
  ip_protocol       = "udp"
  from_port         = 53
  to_port           = 53
  cidr_ipv4         = "0.0.0.0/0"

  tags = {
    Name = "${var.scanner_name}-egress-dns-udp"
  }
}

resource "aws_vpc_security_group_egress_rule" "dns_tcp" {
  security_group_id = aws_security_group.scanner.id
  description       = "DNS TCP"
  ip_protocol       = "tcp"
  from_port         = 53
  to_port           = 53
  cidr_ipv4         = "0.0.0.0/0"

  tags = {
    Name = "${var.scanner_name}-egress-dns-tcp"
  }
}

# =============================================================================
# Outbound Rules - Scanning Ports (Common)
# =============================================================================

# SSH scanning
resource "aws_vpc_security_group_egress_rule" "ssh" {
  security_group_id = aws_security_group.scanner.id
  description       = "SSH scanning"
  ip_protocol       = "tcp"
  from_port         = 22
  to_port           = 22
  cidr_ipv4         = "0.0.0.0/0"

  tags = {
    Name = "${var.scanner_name}-egress-ssh"
  }
}

# Web scanning - additional ports
resource "aws_vpc_security_group_egress_rule" "web_8080" {
  security_group_id = aws_security_group.scanner.id
  description       = "Web scanning - 8080"
  ip_protocol       = "tcp"
  from_port         = 8080
  to_port           = 8080
  cidr_ipv4         = "0.0.0.0/0"

  tags = {
    Name = "${var.scanner_name}-egress-web-8080"
  }
}

resource "aws_vpc_security_group_egress_rule" "web_8443" {
  security_group_id = aws_security_group.scanner.id
  description       = "Web scanning - 8443"
  ip_protocol       = "tcp"
  from_port         = 8443
  to_port           = 8443
  cidr_ipv4         = "0.0.0.0/0"

  tags = {
    Name = "${var.scanner_name}-egress-web-8443"
  }
}

# SMB scanning
resource "aws_vpc_security_group_egress_rule" "smb" {
  security_group_id = aws_security_group.scanner.id
  description       = "SMB scanning"
  ip_protocol       = "tcp"
  from_port         = 445
  to_port           = 445
  cidr_ipv4         = "0.0.0.0/0"

  tags = {
    Name = "${var.scanner_name}-egress-smb"
  }
}

# SNMP scanning
resource "aws_vpc_security_group_egress_rule" "snmp" {
  security_group_id = aws_security_group.scanner.id
  description       = "SNMP scanning"
  ip_protocol       = "udp"
  from_port         = 161
  to_port           = 161
  cidr_ipv4         = "0.0.0.0/0"

  tags = {
    Name = "${var.scanner_name}-egress-snmp"
  }
}

# WinRM scanning
resource "aws_vpc_security_group_egress_rule" "winrm" {
  security_group_id = aws_security_group.scanner.id
  description       = "WinRM scanning"
  ip_protocol       = "tcp"
  from_port         = 5985
  to_port           = 5986
  cidr_ipv4         = "0.0.0.0/0"

  tags = {
    Name = "${var.scanner_name}-egress-winrm"
  }
}

# Database scanning - MySQL
resource "aws_vpc_security_group_egress_rule" "mysql" {
  security_group_id = aws_security_group.scanner.id
  description       = "MySQL scanning"
  ip_protocol       = "tcp"
  from_port         = 3306
  to_port           = 3306
  cidr_ipv4         = "0.0.0.0/0"

  tags = {
    Name = "${var.scanner_name}-egress-mysql"
  }
}

# Database scanning - PostgreSQL
resource "aws_vpc_security_group_egress_rule" "postgresql" {
  security_group_id = aws_security_group.scanner.id
  description       = "PostgreSQL scanning"
  ip_protocol       = "tcp"
  from_port         = 5432
  to_port           = 5432
  cidr_ipv4         = "0.0.0.0/0"

  tags = {
    Name = "${var.scanner_name}-egress-postgresql"
  }
}

# Database scanning - MongoDB
resource "aws_vpc_security_group_egress_rule" "mongodb" {
  security_group_id = aws_security_group.scanner.id
  description       = "MongoDB scanning"
  ip_protocol       = "tcp"
  from_port         = 27017
  to_port           = 27017
  cidr_ipv4         = "0.0.0.0/0"

  tags = {
    Name = "${var.scanner_name}-egress-mongodb"
  }
}

# Database scanning - Redis
resource "aws_vpc_security_group_egress_rule" "redis" {
  security_group_id = aws_security_group.scanner.id
  description       = "Redis scanning"
  ip_protocol       = "tcp"
  from_port         = 6379
  to_port           = 6379
  cidr_ipv4         = "0.0.0.0/0"

  tags = {
    Name = "${var.scanner_name}-egress-redis"
  }
}

# FTP scanning
resource "aws_vpc_security_group_egress_rule" "ftp" {
  security_group_id = aws_security_group.scanner.id
  description       = "FTP scanning"
  ip_protocol       = "tcp"
  from_port         = 21
  to_port           = 21
  cidr_ipv4         = "0.0.0.0/0"

  tags = {
    Name = "${var.scanner_name}-egress-ftp"
  }
}

# =============================================================================
# Outbound Rules - Full Port Scanning (Optional)
# =============================================================================

# Full TCP port range for comprehensive scanning
resource "aws_vpc_security_group_egress_rule" "full_tcp" {
  count = var.enable_full_port_scanning ? 1 : 0

  security_group_id = aws_security_group.scanner.id
  description       = "Full TCP port range for scanning"
  ip_protocol       = "tcp"
  from_port         = 1
  to_port           = 65535
  cidr_ipv4         = "0.0.0.0/0"

  tags = {
    Name = "${var.scanner_name}-egress-full-tcp"
  }
}

# Full UDP port range for comprehensive scanning
resource "aws_vpc_security_group_egress_rule" "full_udp" {
  count = var.enable_full_port_scanning ? 1 : 0

  security_group_id = aws_security_group.scanner.id
  description       = "Full UDP port range for scanning"
  ip_protocol       = "udp"
  from_port         = 1
  to_port           = 65535
  cidr_ipv4         = "0.0.0.0/0"

  tags = {
    Name = "${var.scanner_name}-egress-full-udp"
  }
}

# =============================================================================
# Inbound Rules - SSH Management Access (Optional)
# =============================================================================

resource "aws_vpc_security_group_ingress_rule" "ssh" {
  count = length(var.allowed_ssh_cidrs) > 0 ? length(var.allowed_ssh_cidrs) : 0

  security_group_id = aws_security_group.scanner.id
  description       = "SSH management access from ${var.allowed_ssh_cidrs[count.index]}"
  ip_protocol       = "tcp"
  from_port         = 22
  to_port           = 22
  cidr_ipv4         = var.allowed_ssh_cidrs[count.index]

  tags = {
    Name = "${var.scanner_name}-ingress-ssh-${count.index}"
  }
}
iam.tf
# CyberOptix Scanner - IAM Configuration

# IAM role for the scanner instance
resource "aws_iam_role" "scanner" {
  name_prefix = "${var.scanner_name}-"
  description = "IAM role for CyberOptix Scanner instances"

  assume_role_policy = jsonencode({
    Version = "2012-10-17"
    Statement = [
      {
        Action = "sts:AssumeRole"
        Effect = "Allow"
        Principal = {
          Service = "ec2.amazonaws.com"
        }
      }
    ]
  })

  tags = merge(var.additional_tags, {
    Name = "${var.scanner_name}-role"
  })
}

# Policy for SSM Parameter Store access (when using SSM for configuration)
resource "aws_iam_role_policy" "ssm_parameters" {
  count = var.ssm_prefix != "" ? 1 : 0

  name = "ssm-parameter-access"
  role = aws_iam_role.scanner.id

  policy = jsonencode({
    Version = "2012-10-17"
    Statement = [
      {
        Effect = "Allow"
        Action = [
          "ssm:GetParameter",
          "ssm:GetParameters",
          "ssm:GetParametersByPath"
        ]
        Resource = [
          "arn:aws:ssm:${data.aws_region.current.name}:${data.aws_caller_identity.current.account_id}:parameter${var.ssm_prefix}/*"
        ]
      },
      {
        Effect = "Allow"
        Action = [
          "kms:Decrypt"
        ]
        Resource = "*"
        Condition = {
          StringEquals = {
            "kms:ViaService" = "ssm.${data.aws_region.current.name}.amazonaws.com"
          }
        }
      }
    ]
  })
}

# Optional: CloudWatch Logs policy for log shipping
resource "aws_iam_role_policy" "cloudwatch_logs" {
  name = "cloudwatch-logs-access"
  role = aws_iam_role.scanner.id

  policy = jsonencode({
    Version = "2012-10-17"
    Statement = [
      {
        Effect = "Allow"
        Action = [
          "logs:CreateLogGroup",
          "logs:CreateLogStream",
          "logs:PutLogEvents",
          "logs:DescribeLogStreams"
        ]
        Resource = [
          "arn:aws:logs:${data.aws_region.current.name}:${data.aws_caller_identity.current.account_id}:log-group:/cyberoptix/*"
        ]
      }
    ]
  })
}

# Instance profile
resource "aws_iam_instance_profile" "scanner" {
  name_prefix = "${var.scanner_name}-"
  role        = aws_iam_role.scanner.name

  tags = merge(var.additional_tags, {
    Name = "${var.scanner_name}-instance-profile"
  })
}
ec2.tf
# CyberOptix Scanner - EC2 Instance Configuration

resource "aws_instance" "scanner" {
  count = var.instance_count

  ami                    = data.aws_ami.scanner.id
  instance_type          = var.instance_type
  subnet_id              = var.subnet_id
  vpc_security_group_ids = [aws_security_group.scanner.id]
  iam_instance_profile   = aws_iam_instance_profile.scanner.name
  key_name               = var.key_name != "" ? var.key_name : null

  root_block_device {
    volume_size           = var.root_volume_size
    volume_type           = "gp3"
    iops                  = 3000
    throughput            = 125
    encrypted             = true
    delete_on_termination = true

    tags = merge(var.additional_tags, {
      Name = "${var.scanner_name}-${count.index + 1}-root"
    })
  }

  user_data = base64encode(templatefile("${path.module}/user-data.tftpl", {
    ssm_prefix       = var.ssm_prefix
    api_url          = var.api_url
    scanner_group_id = var.scanner_group_id
    organization_id  = var.organization_id
    license_key      = var.license_key
    aws_region       = var.aws_region
  }))

  metadata_options {
    http_endpoint               = "enabled"
    http_tokens                 = "required" # IMDSv2 required
    http_put_response_hop_limit = 1
    instance_metadata_tags      = "enabled"
  }

  tags = merge(var.additional_tags, {
    Name        = "${var.scanner_name}-${count.index + 1}"
    Environment = var.environment
    Platform    = var.platform
  })

  lifecycle {
    ignore_changes = [
      ami, # Don't replace on AMI updates
    ]
  }
}
outputs.tf
# CyberOptix Scanner - Terraform Outputs

output "scanner_instance_ids" {
  description = "List of scanner EC2 instance IDs"
  value       = aws_instance.scanner[*].id
}

output "scanner_private_ips" {
  description = "List of scanner private IP addresses"
  value       = aws_instance.scanner[*].private_ip
}

output "scanner_public_ips" {
  description = "List of scanner public IP addresses (if assigned)"
  value       = aws_instance.scanner[*].public_ip
}

output "scanner_ami_id" {
  description = "AMI ID used for scanner instances"
  value       = data.aws_ami.scanner.id
}

output "scanner_ami_name" {
  description = "AMI name used for scanner instances"
  value       = data.aws_ami.scanner.name
}

output "security_group_id" {
  description = "Security group ID for scanner instances"
  value       = aws_security_group.scanner.id
}

output "iam_role_arn" {
  description = "IAM role ARN for scanner instances"
  value       = aws_iam_role.scanner.arn
}

output "ssh_connection_strings" {
  description = "SSH connection commands for each scanner (using appropriate default user)"
  value = [
    for i, instance in aws_instance.scanner :
    var.platform == "ubuntu"
    ? "ssh -i <your-key.pem> ubuntu@${coalesce(instance.public_ip, instance.private_ip)}"
    : "ssh -i <your-key.pem> ec2-user@${coalesce(instance.public_ip, instance.private_ip)}"
  ]
}

output "scanner_details" {
  description = "Detailed information about deployed scanners"
  value = {
    for i, instance in aws_instance.scanner :
    "scanner-${i + 1}" => {
      instance_id = instance.id
      private_ip  = instance.private_ip
      public_ip   = instance.public_ip
      platform    = var.platform
      ssh_user    = var.platform == "ubuntu" ? "ubuntu" : "ec2-user"
    }
  }
}
user-data.tftpl
#!/bin/bash
# CyberOptix Scanner - Bootstrap Script
# This script runs on first boot to configure the scanner

set -e

# Log all output to a file for troubleshooting
exec > >(tee /var/log/cyberoptix-bootstrap.log) 2>&1
echo "=== CyberOptix Scanner Bootstrap Started at $(date) ==="

# Wait for cloud-init to complete
cloud-init status --wait || true

%{ if ssm_prefix != "" }
# =============================================================================
# Option A: Fetch configuration from SSM Parameter Store
# =============================================================================
echo "Fetching configuration from SSM Parameter Store..."

export AWS_DEFAULT_REGION="${aws_region}"

API_URL=$(aws ssm get-parameter --name "${ssm_prefix}/api_url" --with-decryption --query 'Parameter.Value' --output text)
SCANNER_GROUP_ID=$(aws ssm get-parameter --name "${ssm_prefix}/scanner_group_id" --with-decryption --query 'Parameter.Value' --output text)
ORGANIZATION_ID=$(aws ssm get-parameter --name "${ssm_prefix}/organization_id" --with-decryption --query 'Parameter.Value' --output text)
LICENSE_KEY=$(aws ssm get-parameter --name "${ssm_prefix}/license_key" --with-decryption --query 'Parameter.Value' --output text)

echo "Configuration fetched from SSM successfully"
%{ else }
# =============================================================================
# Option B: Use direct parameters passed via user-data
# =============================================================================
echo "Using direct configuration parameters..."

API_URL="${api_url}"
SCANNER_GROUP_ID="${scanner_group_id}"
ORGANIZATION_ID="${organization_id}"
LICENSE_KEY="${license_key}"
%{ endif }

# =============================================================================
# Validate configuration
# =============================================================================
if [ -z "$API_URL" ] || [ -z "$SCANNER_GROUP_ID" ] || [ -z "$ORGANIZATION_ID" ] || [ -z "$LICENSE_KEY" ]; then
    echo "ERROR: Missing required configuration parameters"
    echo "API_URL: $${API_URL:+set}"
    echo "SCANNER_GROUP_ID: $${SCANNER_GROUP_ID:+set}"
    echo "ORGANIZATION_ID: $${ORGANIZATION_ID:+set}"
    echo "LICENSE_KEY: $${LICENSE_KEY:+set}"
    exit 1
fi

echo "All required configuration parameters are set"

# =============================================================================
# Install license key
# =============================================================================
echo "Installing license key..."
echo "$LICENSE_KEY" > /etc/optix/license.key
chmod 600 /etc/optix/license.key
chown optix:optix /etc/optix/license.key
echo "License key installed"

# =============================================================================
# Pull and start Docker containers
# =============================================================================
echo "Pulling Docker images..."
docker compose -f /etc/optix/docker-compose-optix.yml --profile disable pull

echo "Starting Docker containers..."
docker compose -f /etc/optix/docker-compose-optix.yml up -d

# Wait for containers to be healthy
echo "Waiting for containers to be ready..."
sleep 10

# Verify containers are running
docker ps

# =============================================================================
# Synchronize vulnerability tests
# =============================================================================
echo "Synchronizing vulnerability tests..."
/usr/local/bin/sync-vulnerability-tests.sh || {
    echo "WARNING: Initial vulnerability test sync failed. Will retry via timer."
}

# =============================================================================
# Link scanner to CyberOptix
# =============================================================================
echo "Linking scanner to CyberOptix..."
scanner-link -url "$API_URL" \
    -scanner_group_id "$SCANNER_GROUP_ID" \
    -organization_id "$ORGANIZATION_ID"

echo "Scanner linked successfully"

# =============================================================================
# Set file permissions
# =============================================================================
echo "Setting file permissions..."
chown optix:optix -R /etc/optix/
chmod 600 /etc/optix/scanner-config.json
chown optix:optix /var/lib/optix
chown optix:optix /var/lib/optix/vulnerability_tests 2>/dev/null || true
chown optix:optix /var/log/optix

# =============================================================================
# Enable and start scanner services
# =============================================================================
echo "Enabling and starting scanner services..."
systemctl enable --now \
    scanner-active-discovery.service \
    scanner-client-completed-tasks.service \
    scanner-client-new-tasks.service \
    scanner-task-manager.service \
    scanner-vm.service

# Enable automatic vulnerability test synchronization
echo "Enabling automatic vulnerability test sync..."
systemctl enable --now optix-sync-tests.timer

# =============================================================================
# Verify services
# =============================================================================
echo "Verifying services..."
sleep 5

systemctl is-active scanner-vm.service && echo "scanner-vm: OK" || echo "scanner-vm: FAILED"
systemctl is-active scanner-task-manager.service && echo "scanner-task-manager: OK" || echo "scanner-task-manager: FAILED"
systemctl is-active scanner-active-discovery.service && echo "scanner-active-discovery: OK" || echo "scanner-active-discovery: FAILED"
systemctl is-active scanner-client-new-tasks.service && echo "scanner-client-new-tasks: OK" || echo "scanner-client-new-tasks: FAILED"
systemctl is-active scanner-client-completed-tasks.service && echo "scanner-client-completed-tasks: OK" || echo "scanner-client-completed-tasks: FAILED"

echo "=== CyberOptix Scanner Bootstrap Completed at $(date) ==="
Terraform Configuration Options
Option A: SSM Parameter Store (Recommended)
# terraform.tfvars
vpc_id     = "vpc-xxxxxxxxxxxxxxxxx"
subnet_id  = "subnet-xxxxxxxxxxxxxxxxx"
ssm_prefix = "/cyberoptix/scanner"
Option B: Direct Parameters
# terraform.tfvars
vpc_id           = "vpc-xxxxxxxxxxxxxxxxx"
subnet_id        = "subnet-xxxxxxxxxxxxxxxxx"
ssm_prefix       = ""
api_url          = "https://mycompany-api.cyberoptix.io"
scanner_group_id = "xxxxxxxx-xxxx-xxxx-xxxx-xxxxxxxxxxxx"
organization_id  = "xxxxxxxx-xxxx-xxxx-xxxx-xxxxxxxxxxxx"
license_key      = "your-license-key"
Terraform Variables Reference
| Variable | Required | Default | Description |
|---|---|---|---|
vpc_id | Yes | - | VPC ID for deployment |
subnet_id | Yes | - | Subnet ID (private with NAT recommended) |
ssm_prefix | No | "" | SSM parameter path prefix |
platform | No | ubuntu | AMI platform: ubuntu or rhel |
instance_type | No | t3.xlarge | EC2 instance type |
root_volume_size | No | 120 | Root volume size (GB) |
instance_count | No | 1 | Number of scanner instances |
key_name | No | "" | SSH key pair name |
allowed_ssh_cidrs | No | [] | CIDRs allowed SSH access |
enable_full_port_scanning | No | false | Allow all outbound ports |
Terraform Outputs
After deployment:
# Get scanner IPs
terraform output scanner_private_ips

# Get SSH connection commands
terraform output ssh_connection_strings
Deploy with CloudFormation
Use AWS CloudFormation for native AWS infrastructure as code deployments.
Prerequisites
- AWS CLI configured with credentials
Quick Start
1. Find the latest AMI ID:
# Ubuntu 24.04 AMI
aws ec2 describe-images \
  --owners 739275446494 \
  --filters "Name=name,Values=optix-appliance-ubuntu-*" \
  --query 'Images | sort_by(@, &CreationDate) | [-1].ImageId' \
  --output text

# RHEL 9 AMI
aws ec2 describe-images \
  --owners 739275446494 \
  --filters "Name=name,Values=optix-appliance-rhel-*" \
  --query 'Images | sort_by(@, &CreationDate) | [-1].ImageId' \
  --output text
2. Create SSM Parameters (Recommended):
aws ssm put-parameter \
  --name "/cyberoptix/scanner/api_url" \
  --value "https://mycompany-api.cyberoptix.io" \
  --type SecureString

aws ssm put-parameter \
  --name "/cyberoptix/scanner/scanner_group_id" \
  --value "your-scanner-group-uuid" \
  --type SecureString

aws ssm put-parameter \
  --name "/cyberoptix/scanner/organization_id" \
  --value "your-organization-uuid" \
  --type SecureString

aws ssm put-parameter \
  --name "/cyberoptix/scanner/license_key" \
  --value "your-license-key" \
  --type SecureString
3. Save the CloudFormation template:
Create a file named scanner.yaml with the CloudFormation template from the section below.
4. Deploy the stack:
aws cloudformation create-stack \
  --stack-name cyberoptix-scanner \
  --template-body file://scanner.yaml \
  --parameters \
    ParameterKey=VpcId,ParameterValue=vpc-xxxxxxxxx \
    ParameterKey=SubnetId,ParameterValue=subnet-xxxxxxxxx \
    ParameterKey=AmiId,ParameterValue=ami-xxxxxxxxx \
    ParameterKey=SSMPrefix,ParameterValue=/cyberoptix/scanner \
  --capabilities CAPABILITY_NAMED_IAM
5. Monitor deployment:
aws cloudformation wait stack-create-complete --stack-name cyberoptix-scanner
aws cloudformation describe-stacks --stack-name cyberoptix-scanner --query 'Stacks[0].Outputs'
CloudFormation Template
Save the following as scanner.yaml:
AWSTemplateFormatVersion: '2010-09-09'
Description: |
  CyberOptix Scanner Deployment Template
  Deploys CyberOptix vulnerability scanner instances from pre-built AMIs.

  Prerequisites:
  - Existing VPC with subnet
  - CyberOptix account with scanner group and organization ID
  - License key for vulnerability test synchronization

Metadata:
  AWS::CloudFormation::Interface:
    ParameterGroups:
      - Label:
          default: Network Configuration
        Parameters:
          - VpcId
          - SubnetId
          - AllowedSSHCidrs
      - Label:
          default: Scanner Configuration (SSM - Recommended)
        Parameters:
          - SSMPrefix
      - Label:
          default: Scanner Configuration (Direct Parameters)
        Parameters:
          - ApiUrl
          - ScannerGroupId
          - OrganizationId
          - LicenseKey
      - Label:
          default: Instance Configuration
        Parameters:
          - AmiId
          - Platform
          - InstanceType
          - RootVolumeSize
          - InstanceCount
          - KeyName
      - Label:
          default: Tags
        Parameters:
          - ScannerName
          - Environment

Parameters:
  # Network Configuration
  VpcId:
    Type: AWS::EC2::VPC::Id
    Description: VPC ID where the scanner will be deployed

  SubnetId:
    Type: AWS::EC2::Subnet::Id
    Description: Subnet ID for the scanner (private subnet with NAT gateway recommended)

  AllowedSSHCidrs:
    Type: CommaDelimitedList
    Default: ''
    Description: Comma-separated list of CIDR blocks allowed SSH access (leave empty to disable SSH)

  # Scanner Configuration - SSM (Recommended)
  SSMPrefix:
    Type: String
    Default: ''
    Description: |
      SSM Parameter Store prefix (e.g., /cyberoptix/scanner).
      If set, scanner config will be fetched from SSM parameters:
      {prefix}/api_url, {prefix}/scanner_group_id, {prefix}/organization_id, {prefix}/license_key

  # Scanner Configuration - Direct Parameters
  ApiUrl:
    Type: String
    Default: ''
    Description: CyberOptix API URL (required if SSMPrefix is not set)

  ScannerGroupId:
    Type: String
    Default: ''
    Description: Scanner group UUID from CyberOptix (required if SSMPrefix is not set)

  OrganizationId:
    Type: String
    Default: ''
    Description: Organization UUID from CyberOptix (required if SSMPrefix is not set)

  LicenseKey:
    Type: String
    Default: ''
    NoEcho: true
    Description: License key for vulnerability test sync (required if SSMPrefix is not set)

  # Instance Configuration
  AmiId:
    Type: AWS::EC2::Image::Id
    Description: |
      CyberOptix Scanner AMI ID. Find the latest AMI using AWS CLI:
      aws ec2 describe-images --owners 739275446494 --filters "Name=name,Values=optix-appliance-ubuntu-*" --query 'Images | sort_by(@, &CreationDate) | [-1].ImageId' --output text

  Platform:
    Type: String
    Default: ubuntu
    AllowedValues:
      - ubuntu
      - rhel
    Description: Scanner AMI platform (for SSH user selection - ubuntu or rhel)

  InstanceType:
    Type: String
    Default: t3.xlarge
    AllowedValues:
      - t3.large
      - t3.xlarge
      - t3.2xlarge
      - m5.large
      - m5.xlarge
      - m5.2xlarge
    Description: EC2 instance type (recommended t3.xlarge, minimum t3.large)

  RootVolumeSize:
    Type: Number
    Default: 120
    MinValue: 100
    Description: Root EBS volume size in GB (minimum 100)

  InstanceCount:
    Type: Number
    Default: 1
    MinValue: 1
    MaxValue: 10
    Description: Number of scanner instances to deploy

  KeyName:
    Type: String
    Default: ''
    Description: EC2 key pair name for SSH access (leave empty to disable)

  # Tags
  ScannerName:
    Type: String
    Default: cyberoptix-scanner
    Description: Name prefix for scanner resources

  Environment:
    Type: String
    Default: production
    AllowedValues:
      - production
      - staging
      - development
    Description: Environment name

Conditions:
  HasSSMPrefix: !Not [!Equals [!Ref SSMPrefix, '']]
  HasKeyName: !Not [!Equals [!Ref KeyName, '']]
  HasSSHCidrs: !Not [!Equals [!Join ['', !Ref AllowedSSHCidrs], '']]
  CreateMultipleInstances: !Not [!Equals [!Ref InstanceCount, 1]]

Mappings:
  AMIOwner:
    Global:
      OwnerId: '739275446494'

Resources:
  # Security Group
  ScannerSecurityGroup:
    Type: AWS::EC2::SecurityGroup
    Properties:
      GroupDescription: Security group for CyberOptix Scanner
      VpcId: !Ref VpcId
      Tags:
        - Key: Name
          Value: !Sub '${ScannerName}-sg'
        - Key: Application
          Value: CyberOptix Scanner
        - Key: Environment
          Value: !Ref Environment

  # Outbound Rules - Required
  # Note: Using 0.0.0.0/0 because AWS SGs cannot use DNS names and IPs may change.
  # Required destinations:
  #   - rsync.purpleteamsoftware.com:873 (vulnerability test sync)
  #   - identity.purpleteamsoftware.com:8443 (authentication)
  #   - app.cyberoptix.io:443, app-api.cyberoptix.io:443 (platform)
  #   - apt/dnf.purpleteamsoftware.com:80/443 (scanner package updates)
  #   - archive.ubuntu.com, cdn.redhat.com (OS updates)
  #   - github.com:443, hub.docker.com:443, ghcr.io:443 (Docker/dependencies)

  EgressHTTPS:
    Type: AWS::EC2::SecurityGroupEgress
    Properties:
      GroupId: !Ref ScannerSecurityGroup
      Description: HTTPS - CyberOptix platform, Docker registry, updates
      IpProtocol: tcp
      FromPort: 443
      ToPort: 443
      CidrIp: 0.0.0.0/0

  EgressHTTP:
    Type: AWS::EC2::SecurityGroupEgress
    Properties:
      GroupId: !Ref ScannerSecurityGroup
      Description: HTTP - OS and scanner package updates
      IpProtocol: tcp
      FromPort: 80
      ToPort: 80
      CidrIp: 0.0.0.0/0

  EgressRsync:
    Type: AWS::EC2::SecurityGroupEgress
    Properties:
      GroupId: !Ref ScannerSecurityGroup
      Description: Rsync - rsync.purpleteamsoftware.com vulnerability test sync
      IpProtocol: tcp
      FromPort: 873
      ToPort: 873
      CidrIp: 0.0.0.0/0

  EgressIdentity:
    Type: AWS::EC2::SecurityGroupEgress
    Properties:
      GroupId: !Ref ScannerSecurityGroup
      Description: HTTPS 8443 - identity.purpleteamsoftware.com authentication
      IpProtocol: tcp
      FromPort: 8443
      ToPort: 8443
      CidrIp: 0.0.0.0/0

  EgressDNSUDP:
    Type: AWS::EC2::SecurityGroupEgress
    Properties:
      GroupId: !Ref ScannerSecurityGroup
      Description: DNS UDP
      IpProtocol: udp
      FromPort: 53
      ToPort: 53
      CidrIp: 0.0.0.0/0

  EgressDNSTCP:
    Type: AWS::EC2::SecurityGroupEgress
    Properties:
      GroupId: !Ref ScannerSecurityGroup
      Description: DNS TCP
      IpProtocol: tcp
      FromPort: 53
      ToPort: 53
      CidrIp: 0.0.0.0/0

  # Outbound Rules - Scanning
  EgressSSH:
    Type: AWS::EC2::SecurityGroupEgress
    Properties:
      GroupId: !Ref ScannerSecurityGroup
      Description: SSH scanning
      IpProtocol: tcp
      FromPort: 22
      ToPort: 22
      CidrIp: 0.0.0.0/0

  EgressWeb8080:
    Type: AWS::EC2::SecurityGroupEgress
    Properties:
      GroupId: !Ref ScannerSecurityGroup
      Description: Web scanning - 8080
      IpProtocol: tcp
      FromPort: 8080
      ToPort: 8080
      CidrIp: 0.0.0.0/0

  EgressWeb8443:
    Type: AWS::EC2::SecurityGroupEgress
    Properties:
      GroupId: !Ref ScannerSecurityGroup
      Description: Web scanning - 8443
      IpProtocol: tcp
      FromPort: 8443
      ToPort: 8443
      CidrIp: 0.0.0.0/0

  EgressSMB:
    Type: AWS::EC2::SecurityGroupEgress
    Properties:
      GroupId: !Ref ScannerSecurityGroup
      Description: SMB scanning
      IpProtocol: tcp
      FromPort: 445
      ToPort: 445
      CidrIp: 0.0.0.0/0

  EgressSNMP:
    Type: AWS::EC2::SecurityGroupEgress
    Properties:
      GroupId: !Ref ScannerSecurityGroup
      Description: SNMP scanning
      IpProtocol: udp
      FromPort: 161
      ToPort: 161
      CidrIp: 0.0.0.0/0

  EgressWinRM:
    Type: AWS::EC2::SecurityGroupEgress
    Properties:
      GroupId: !Ref ScannerSecurityGroup
      Description: WinRM scanning
      IpProtocol: tcp
      FromPort: 5985
      ToPort: 5986
      CidrIp: 0.0.0.0/0

  EgressMySQL:
    Type: AWS::EC2::SecurityGroupEgress
    Properties:
      GroupId: !Ref ScannerSecurityGroup
      Description: MySQL scanning
      IpProtocol: tcp
      FromPort: 3306
      ToPort: 3306
      CidrIp: 0.0.0.0/0

  EgressPostgreSQL:
    Type: AWS::EC2::SecurityGroupEgress
    Properties:
      GroupId: !Ref ScannerSecurityGroup
      Description: PostgreSQL scanning
      IpProtocol: tcp
      FromPort: 5432
      ToPort: 5432
      CidrIp: 0.0.0.0/0

  EgressMongoDB:
    Type: AWS::EC2::SecurityGroupEgress
    Properties:
      GroupId: !Ref ScannerSecurityGroup
      Description: MongoDB scanning
      IpProtocol: tcp
      FromPort: 27017
      ToPort: 27017
      CidrIp: 0.0.0.0/0

  EgressRedis:
    Type: AWS::EC2::SecurityGroupEgress
    Properties:
      GroupId: !Ref ScannerSecurityGroup
      Description: Redis scanning
      IpProtocol: tcp
      FromPort: 6379
      ToPort: 6379
      CidrIp: 0.0.0.0/0

  EgressFTP:
    Type: AWS::EC2::SecurityGroupEgress
    Properties:
      GroupId: !Ref ScannerSecurityGroup
      Description: FTP scanning
      IpProtocol: tcp
      FromPort: 21
      ToPort: 21
      CidrIp: 0.0.0.0/0

  # IAM Role
  ScannerRole:
    Type: AWS::IAM::Role
    Properties:
      RoleName: !Sub '${ScannerName}-role'
      Description: IAM role for CyberOptix Scanner instances
      AssumeRolePolicyDocument:
        Version: '2012-10-17'
        Statement:
          - Effect: Allow
            Principal:
              Service: ec2.amazonaws.com
            Action: sts:AssumeRole
      Tags:
        - Key: Name
          Value: !Sub '${ScannerName}-role'
        - Key: Application
          Value: CyberOptix Scanner

  # SSM Parameter Access Policy
  SSMParameterPolicy:
    Type: AWS::IAM::Policy
    Condition: HasSSMPrefix
    Properties:
      PolicyName: ssm-parameter-access
      Roles:
        - !Ref ScannerRole
      PolicyDocument:
        Version: '2012-10-17'
        Statement:
          - Effect: Allow
            Action:
              - ssm:GetParameter
              - ssm:GetParameters
              - ssm:GetParametersByPath
            Resource:
              - !Sub 'arn:aws:ssm:${AWS::Region}:${AWS::AccountId}:parameter${SSMPrefix}/*'
          - Effect: Allow
            Action:
              - kms:Decrypt
            Resource: '*'
            Condition:
              StringEquals:
                'kms:ViaService': !Sub 'ssm.${AWS::Region}.amazonaws.com'

  # CloudWatch Logs Policy
  CloudWatchLogsPolicy:
    Type: AWS::IAM::Policy
    Properties:
      PolicyName: cloudwatch-logs-access
      Roles:
        - !Ref ScannerRole
      PolicyDocument:
        Version: '2012-10-17'
        Statement:
          - Effect: Allow
            Action:
              - logs:CreateLogGroup
              - logs:CreateLogStream
              - logs:PutLogEvents
              - logs:DescribeLogStreams
            Resource:
              - !Sub 'arn:aws:logs:${AWS::Region}:${AWS::AccountId}:log-group:/cyberoptix/*'

  # Instance Profile
  ScannerInstanceProfile:
    Type: AWS::IAM::InstanceProfile
    Properties:
      InstanceProfileName: !Sub '${ScannerName}-instance-profile'
      Roles:
        - !Ref ScannerRole

  # EC2 Instance
  ScannerInstance:
    Type: AWS::EC2::Instance
    Properties:
      ImageId: !Ref AmiId
      InstanceType: !Ref InstanceType
      SubnetId: !Ref SubnetId
      SecurityGroupIds:
        - !Ref ScannerSecurityGroup
      IamInstanceProfile: !Ref ScannerInstanceProfile
      KeyName: !If [HasKeyName, !Ref KeyName, !Ref 'AWS::NoValue']
      BlockDeviceMappings:
        - DeviceName: /dev/sda1
          Ebs:
            VolumeSize: !Ref RootVolumeSize
            VolumeType: gp3
            Iops: 3000
            Throughput: 125
            Encrypted: true
            DeleteOnTermination: true
      MetadataOptions:
        HttpEndpoint: enabled
        HttpTokens: required
        HttpPutResponseHopLimit: 1
        InstanceMetadataTags: enabled
      UserData:
        Fn::Base64: !Sub |
          #!/bin/bash
          set -e

          exec > >(tee /var/log/cyberoptix-bootstrap.log) 2>&1
          echo "=== CyberOptix Scanner Bootstrap Started at $(date) ==="

          cloud-init status --wait || true

          # Configuration source
          SSM_PREFIX="${SSMPrefix}"
          API_URL="${ApiUrl}"
          SCANNER_GROUP_ID="${ScannerGroupId}"
          ORGANIZATION_ID="${OrganizationId}"
          LICENSE_KEY="${LicenseKey}"

          if [ -n "$SSM_PREFIX" ]; then
            echo "Fetching configuration from SSM Parameter Store..."
            API_URL=$(aws ssm get-parameter --name "$SSM_PREFIX/api_url" --with-decryption --query 'Parameter.Value' --output text --region ${AWS::Region})
            SCANNER_GROUP_ID=$(aws ssm get-parameter --name "$SSM_PREFIX/scanner_group_id" --with-decryption --query 'Parameter.Value' --output text --region ${AWS::Region})
            ORGANIZATION_ID=$(aws ssm get-parameter --name "$SSM_PREFIX/organization_id" --with-decryption --query 'Parameter.Value' --output text --region ${AWS::Region})
            LICENSE_KEY=$(aws ssm get-parameter --name "$SSM_PREFIX/license_key" --with-decryption --query 'Parameter.Value' --output text --region ${AWS::Region})
          fi

          # Validate
          if [ -z "$API_URL" ] || [ -z "$SCANNER_GROUP_ID" ] || [ -z "$ORGANIZATION_ID" ] || [ -z "$LICENSE_KEY" ]; then
            echo "ERROR: Missing required configuration"
            exit 1
          fi

          # Install license key
          echo "$LICENSE_KEY" > /etc/optix/license.key
          chmod 600 /etc/optix/license.key
          chown optix:optix /etc/optix/license.key

          # Docker containers
          docker compose -f /etc/optix/docker-compose-optix.yml --profile disable pull
          docker compose -f /etc/optix/docker-compose-optix.yml up -d
          sleep 10

          # Sync vulnerability tests
          /usr/local/bin/sync-vulnerability-tests.sh || true

          # Link scanner
          scanner-link -url "$API_URL" -scanner_group_id "$SCANNER_GROUP_ID" -organization_id "$ORGANIZATION_ID"

          # Permissions
          chown optix:optix -R /etc/optix/
          chmod 600 /etc/optix/scanner-config.json

          # Start services
          systemctl enable --now scanner-active-discovery.service scanner-client-completed-tasks.service \
            scanner-client-new-tasks.service scanner-task-manager.service scanner-vm.service
          systemctl enable --now optix-sync-tests.timer

          echo "=== CyberOptix Scanner Bootstrap Completed at $(date) ==="
      Tags:
        - Key: Name
          Value: !Sub '${ScannerName}-1'
        - Key: Application
          Value: CyberOptix Scanner
        - Key: Environment
          Value: !Ref Environment
        - Key: Platform
          Value: !Ref Platform

Outputs:
  ScannerInstanceId:
    Description: Scanner EC2 instance ID
    Value: !Ref ScannerInstance

  ScannerPrivateIp:
    Description: Scanner private IP address
    Value: !GetAtt ScannerInstance.PrivateIp

  ScannerPublicIp:
    Description: Scanner public IP address (if assigned)
    Value: !GetAtt ScannerInstance.PublicIp

  SecurityGroupId:
    Description: Security group ID for scanner
    Value: !Ref ScannerSecurityGroup

  IAMRoleArn:
    Description: IAM role ARN for scanner
    Value: !GetAtt ScannerRole.Arn

  SSHConnectionStringUbuntu:
    Description: SSH connection command (for Ubuntu AMI)
    Value: !Sub 'ssh -i <your-key.pem> ubuntu@${ScannerInstance.PrivateIp}'

  SSHConnectionStringRHEL:
    Description: SSH connection command (for RHEL AMI)
    Value: !Sub 'ssh -i <your-key.pem> ec2-user@${ScannerInstance.PrivateIp}'
CloudFormation Parameters Reference
| Parameter | Required | Default | Description |
|---|---|---|---|
VpcId | Yes | - | VPC ID for deployment |
SubnetId | Yes | - | Subnet ID (private with NAT recommended) |
AmiId | Yes | - | CyberOptix Scanner AMI ID |
SSMPrefix | No | "" | SSM parameter path prefix |
Platform | No | ubuntu | AMI platform (for SSH user) |
InstanceType | No | t3.xlarge | EC2 instance type |
RootVolumeSize | No | 120 | Root volume size (GB) |
KeyName | No | "" | SSH key pair name |
AllowedSSHCidrs | No | "" | Comma-separated CIDRs for SSH |
CloudFormation Stack Management
# Update stack
aws cloudformation update-stack \
  --stack-name cyberoptix-scanner \
  --template-body file://scanner.yaml \
  --parameters file://parameters.json \
  --capabilities CAPABILITY_NAMED_IAM

# Delete stack
aws cloudformation delete-stack --stack-name cyberoptix-scanner
Instance Configuration
Recommended Instance Types
| Instance Type | vCPU | Memory | Use Case |
|---|---|---|---|
| t3.large | 2 | 8 GB | Light scanning, development |
| t3.xlarge | 4 | 16 GB | Standard production scanning |
| t3.2xlarge | 8 | 32 GB | Heavy scanning workloads |
| m5.xlarge | 4 | 16 GB | Consistent performance needs |
Storage Configuration
- Volume Type: gp3 (general purpose SSD)
- Size: 120 GB minimum
- IOPS: 3,000 (default)
- Throughput: 125 MB/s (default)
Network Configuration
VPC Requirements:
- Internet gateway or NAT gateway for outbound connectivity
- Route to CyberOptix platform (0.0.0.0/0 or specific IP ranges)
Security Group Rules - Required Outbound:
| Port | Protocol | Destination | Purpose |
|---|---|---|---|
| 873 | TCP | rsync.purpleteamsoftware.com | Vulnerability test sync |
| 8443 | TCP | identity.purpleteamsoftware.com | Authentication |
| 443 | TCP | app.cyberoptix.io (or custom domain) | CyberOptix platform |
| 443 | TCP | app-api.cyberoptix.io (or custom domain) | CyberOptix API |
| 80, 443 | TCP | archive.ubuntu.com, cdn.redhat.com | OS package updates |
| 80, 443 | TCP | apt.purpleteamsoftware.com, dnf.purpleteamsoftware.com | Scanner package updates |
| 443 | TCP | github.com | Package dependencies |
| 443 | TCP | hub.docker.com, ghcr.io | Docker image registry |
Security Group Rules - Scanning (Outbound to target subnets - Your choice for what will be scanned):
| Port | Protocol | Purpose |
|---|---|---|
| 22 | TCP | SSH scanning |
| 80, 443, 8080, 8443 | TCP | Web scanning |
| 445 | TCP | SMB scanning |
| 161 | UDP | SNMP scanning |
| 3306, 5432, 27017, 6379 | TCP | Database scanning |
| 5985, 5986 | TCP | WinRM scanning |
Security Group Rules - Inbound (Optional):
| Port | Protocol | Source | Purpose |
|---|---|---|---|
| 22 | TCP | Your IP/CIDR | SSH management access |
Post-Deployment
Manual Deployment
After launching the appliance manually:
- Connect via SSH using the default username
- Verify connectivity to CyberOptix platform
- Configure the appliance using the scanner configuration guide
- Link to scanner group with the provided link command
- Assign to zones for automated scanning
Automated Deployment (Terraform/CloudFormation)
When using infrastructure as code templates with SSM parameters:
- Scanner auto-configures on first boot using provided parameters
- Verify scanner appears in CyberOptix scanner group (usually within 2-3 minutes)
- Check bootstrap logs if scanner doesn't appear:
cat /var/log/cyberoptix-bootstrap.log - Assign scanner group to zones for automated scanning
Verify Scanner Status
# Check scanner services
sudo systemctl status scanner-vm.service
sudo systemctl status scanner-task-manager.service

# Check Docker containers
docker ps

# View service logs
sudo journalctl -u scanner-vm.service -f
Available AMI Versions
CyberOptix maintains AMIs for multiple operating systems:
| AMI Name | OS | Default User | Use Case |
|---|---|---|---|
| optix-appliance-ubuntu | Ubuntu 24.04 | ubuntu | Standard deployments |
| optix-appliance-rhel | RHEL 9 | ec2-user | Enterprise environments |
Find latest AMI via CLI:
# Ubuntu
aws ec2 describe-images --owners 739275446494 \
  --filters "Name=name,Values=optix-appliance-ubuntu-*" \
  --query 'Images | sort_by(@, &CreationDate) | [-1].[ImageId,Name,CreationDate]' \
  --output table

# RHEL
aws ec2 describe-images --owners 739275446494 \
  --filters "Name=name,Values=optix-appliance-rhel-*" \
  --query 'Images | sort_by(@, &CreationDate) | [-1].[ImageId,Name,CreationDate]' \
  --output table
Cost Optimization
Right-Sizing:
- Start with t3.large and scale up based on scanning load
- Monitor CPU and memory utilization in CloudWatch
- Use AWS Compute Optimizer recommendations
Scheduling:
- Stop instances when not actively scanning (non-production)
- Use EC2 Instance Scheduler for automated start/stop
- Consider Spot Instances for development/testing
Storage:
- Use gp3 volumes (20% cheaper than gp2)
- Delete old scan data and logs periodically
- Enable EBS snapshots for backup, delete old snapshots
Monitoring & Troubleshooting
CloudWatch Metrics
Monitor these key metrics:
- CPUUtilization - Should remain below 80% during scans
- NetworkIn/NetworkOut - Indicates scanning activity
- DiskReadBytes/DiskWriteBytes - Scan result storage
Common Issues
Cannot connect to CyberOptix platform:
- Verify security group allows outbound 443
- Check route table has internet gateway/NAT gateway
- Confirm DNS resolution is working
SSH connection refused:
- Verify security group allows inbound SSH from your IP
- Check instance is in "running" state
- Confirm you're using correct username (ubuntu vs ec2-user)
Insufficient memory errors:
- Upgrade to instance type with more RAM
- Reduce concurrent scanning tasks
- Increase swap space (not recommended for production)
Scanner not appearing (IaC deployment):
- Check bootstrap log:
cat /var/log/cyberoptix-bootstrap.log - Verify SSM parameters exist and are accessible
- Check IAM role has
ssm:GetParameterpermission
SSM Parameter access denied:
# Test from instance
aws ssm get-parameter --name "/cyberoptix/scanner/api_url" --with-decryption

# Check IAM role
curl http://169.254.169.254/latest/meta-data/iam/info
Security Best Practices
Access Control:
- Restrict SSH access to specific IP addresses
- Use AWS Systems Manager Session Manager instead of SSH
- Rotate SSH keys regularly
Secrets Management:
- Use SSM Parameter Store (SecureString) for scanner configuration
- Attach IAM role with minimum required permissions
- Enable CloudTrail logging for audit
Network Security:
- Deploy in private subnet with NAT gateway
- Use VPC endpoints for AWS service access
- Enable VPC Flow Logs for network monitoring
Updates:
- Enable automatic security updates
- Subscribe to Purple Team Software AMI update notifications
- Test new AMI versions in non-production first
Updating Scanners
Manual Update
# SSH to instance
ssh -i key.pem ubuntu@<instance-ip>

# Run update script
sudo /etc/optix/update_scanner.sh
Terraform Update
# Update to latest AMI (will replace instance)
terraform taint aws_instance.scanner[0]
terraform apply
CloudFormation Update
# Get new AMI ID
NEW_AMI=$(aws ec2 describe-images --owners 739275446494 \
  --filters "Name=name,Values=optix-appliance-ubuntu-*" \
  --query 'Images | sort_by(@, &CreationDate) | [-1].ImageId' --output text)

# Update stack
aws cloudformation update-stack \
  --stack-name cyberoptix-scanner \
  --use-previous-template \
  --parameters ParameterKey=AmiId,ParameterValue=$NEW_AMI \
               ParameterKey=VpcId,UsePreviousValue=true \
               ParameterKey=SubnetId,UsePreviousValue=true \
               ParameterKey=SSMPrefix,UsePreviousValue=true \
  --capabilities CAPABILITY_NAMED_IAM
Next Steps
- Complete appliance configuration
- Link appliance to scanner group
- Assign scanner group to zones
- Configure scan schedules and blackout dates
- Monitor scan results in CyberOptix platform
Additional Resources
Updated 6 months ago