Deploying an Optix OVA Appliance
VMware OVA Appliance Deployment Guide
Guide for deploying CyberOptix appliances in VMware environments using OVA templates.
Overview
CyberOptix appliances are pre-configured virtual machines available as Open Virtualization Appliance (OVA) packages. These appliances provide scanning capabilities for vulnerability management and Syslog collection for the SIEM module. Deploying an OVA appliance in VMware vSphere/ESXi provides quick deployment of scanning capacity in on-premises and private cloud environments.
Prerequisites
- VMware vSphere 6.5 or later, or ESXi 6.5 or later
- vCenter Server access (for centralized management)
- Network with internet connectivity or route to CyberOptix platform
- Sufficient compute and storage resources (see requirements below)
- DHCP-enabled network or available static IP address
System Requirements
Recommended Virtual Machine Configuration
| Resource | Recommended | Minimum | Notes |
|---|---|---|---|
| vCPU | 4 cores | 2 cores | More for heavy scanning |
| Memory | 16 GB | 8 GB | Affects concurrent scan capacity |
| Storage | 120 GB thin | 100 GB thin | Thin provisioning recommended |
| Network | VMXNET3 | VMXNET3 | Optimized virtual NIC |
| OS | Ubuntu 24.04 (64-bit) | Ubuntu 24.04 (64-bit) | Pre-configured in OVA |
Network Requirements
- Outbound HTTPS (443) access to CyberOptix platform
- Outbound access to scan targets (various protocols/ports)
- Inbound SSH (22) access for management (optional)
- DNS resolution capability
Download OVA Package
Latest OVA Version
Download the latest OVA appliance package:
Direct Download:
optix-appliance-1749594109.ova
Direct URL for vCenter Deployment:
https://cyberoptix-scanners.s3.us-east-1.amazonaws.com/ova/latest/optix-appliance-1749594109.ovaNote: The OVA filename contains a build timestamp. Always use the latest version for security updates and feature improvements.
Deployment Steps
Step 1: Deploy OVF Template
- In vSphere Client, navigate to your datacenter or cluster
- Select File → Deploy OVF Template
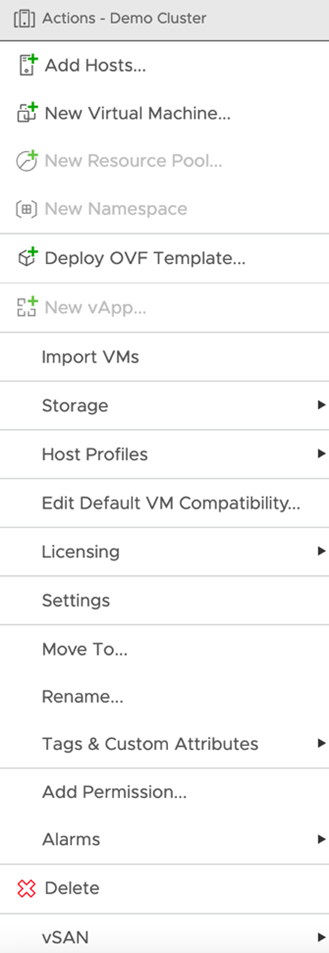
- Choose deployment source:
- Option A: Select Local file and browse to downloaded OVA
- Option B: Select URL and paste the direct URL above
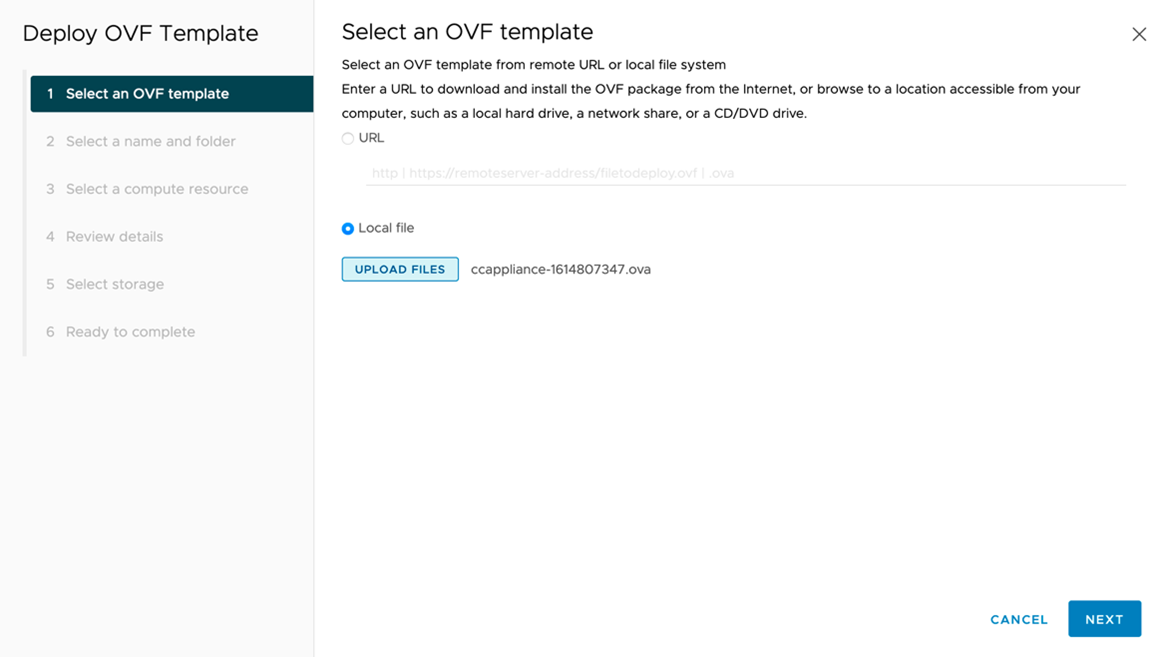
- Click Next to proceed
Step 2: Name the Virtual Machine
- Enter a descriptive name for the appliance
- Example:
cyberoptix-scanner-01 - Naming convention:
cyberoptix-[scanner|collector]-[number]
- Example:
- Select the datacenter or folder location
- Click Next

Step 3: Select Compute Resource
- Select the ESXi host or cluster for deployment
- Review compatibility checks - ensure all checks pass
- Click Next

Step 4: Review Details
- Verify the OVA package details:
- Download size
- Size on disk after deployment
- Publisher information
- Product information
- Click Next to continue

Step 5: Select Storage
- Choose the datastore for virtual machine files
- Select virtual disk format:
- Thin Provision (Recommended) - Disk grows as needed
- Thick Provision Lazy Zeroed - Faster initial deployment
- Thick Provision Eager Zeroed - Best performance, slowest deployment
- Optionally select VM Storage Policy
- Click Next

Tip: Thin provisioning is recommended for most deployments to optimize storage utilization.
Step 6: Select Network
- Map the source network to a destination network
- Select the appropriate port group for appliance connectivity
- Ensure the selected network has:
- Internet connectivity or route to CyberOptix platform
- Access to scan target networks
- DHCP service (or prepare for static IP configuration)
- Click Next

Step 7: Review and Deploy
- Review all configuration settings
- Optionally check Power on after deployment to start the VM automatically
- Click Finish to begin deployment
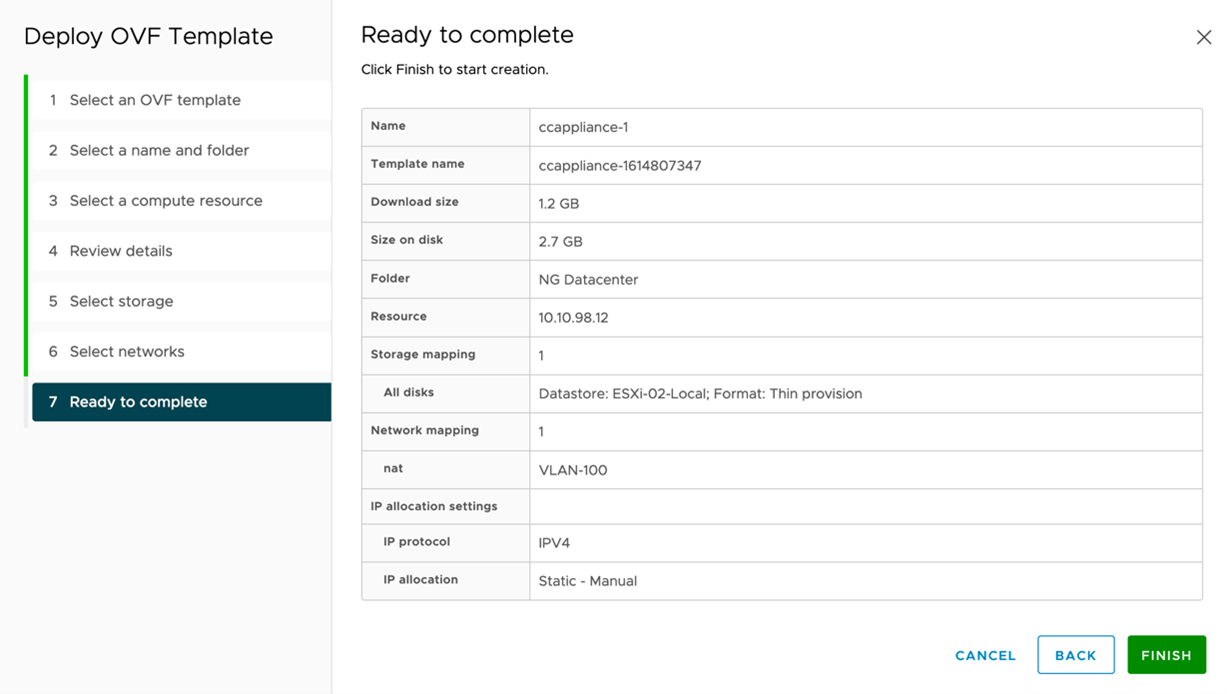
The deployment process will take several minutes depending on network speed and storage performance. Monitor progress in the Recent Tasks panel.
Post-Deployment Configuration
Initial Access
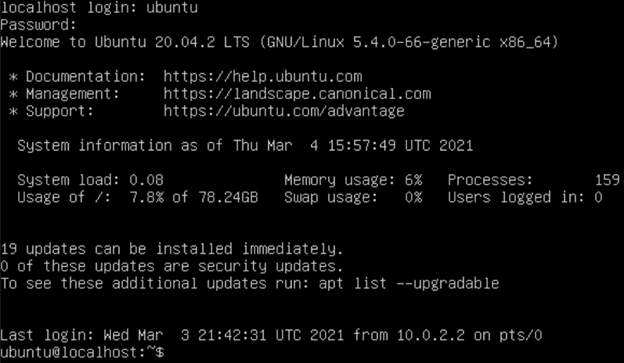
Once the virtual machine is deployed and powered on, allow 2-3 minutes for the operating system to complete boot.
Default Credentials:
| Username | Password | Note |
|---|---|---|
| ubuntu | Youshou1dch@ng3measap | Change immediately! |
Security Warning: The default password must be changed immediately after first login. See Security Configuration below.
Step 1: Login to Console
- Open the VM console in vSphere Client
- Login using the default credentials
Step 2: Update Appliance and Repository
Before configuring the network, update the appliance to the latest packages and ensure the package repository is correctly configured.
Update Repository Keyring
Older appliances may have an outdated repository keyring that needs to be replaced. Follow these steps to update the keyring and refresh packages:
- Remove the old keyring (if it exists):
sudo rm -rf /usr/share/keyrings/purpleteamsoftware-archive-keyring.gpg- Download and install the new keyring:
wget -O - https://apt.fury.io/purpleteamsoftware/gpg.key | sudo gpg --dearmor -o /usr/share/keyrings/purpleteamsoftware-archive-keyring.gpg- Add the Purple Team Software repository:
echo "deb [signed-by=/usr/share/keyrings/purpleteamsoftware-archive-keyring.gpg] https://apt.purpleteamsoftware.com/ /" | sudo tee /etc/apt/sources.list.d/purpleteamsoftware.listUpdate System Packages
Update all system packages to the latest versions:
sudo apt update && sudo apt dist-upgradeExpected Output:
- Package lists are updated from repositories
- Available upgrades are downloaded and installed
- System packages are upgraded to latest versions
Note: The dist-upgrade process may take 5-15 minutes depending on the number of packages requiring updates. If prompted to restart services or accept configuration changes, select the appropriate option for your environment.
If prompted during upgrade:
- Restart services: Select Yes to restart services automatically
- Configuration file changes: Select Keep current version unless you know specific changes are needed
Step 3: Verify Network Configuration
The appliance uses Netplan with a dynamic interface matching configuration, so network interfaces are automatically detected without manual configuration.
Check Network Connectivity
Verify that the appliance received an IP address via DHCP:
ip addressExpected Output:
- Interface name (e.g.,
ens32,ens192,ens160) - Assigned IP address from DHCP
- Link status (UP/DOWN)
Default Netplan Configuration
The default netplan configuration uses interface name matching to automatically detect Ethernet adapters:
network:
  version: 2
  ethernets:
    all-en:
      match:
        name: "en*"
      dhcp4: true
This configuration automatically applies to all interfaces matching the pattern en* (e.g., ens32, ens192, ens160, enp0s3), so no manual interface name updates are required for DHCP configurations.
Note: The interface name varies based on VMware hardware version and configuration, but the match pattern handles all standard Ethernet interface names automatically.
Verify Internet Connectivity
Test connectivity to ensure the network is properly configured:
# Test DNS resolution
nslookup cyberoptix.io

# Test internet connectivity
ping -c 4 8.8.8.8
Step 4: Configure Static IP (Optional)
If DHCP is not available or a static IP is required, modify the Netplan configuration to use a static IP address.
Edit Netplan Configuration
- Open the Netplan configuration file:
sudo vim /etc/netplan/00-installer-config.yaml- Replace the DHCP configuration with static IP settings:
network:
  version: 2
  ethernets:
    all-en:
      match:
        name: "en*"
      dhcp4: false
      addresses:
        - "192.168.199.10/24"  # Your static IP and subnet mask
      nameservers:
        search: [mydomain.local]  # Your domain search path
        addresses:
          - 172.31.254.15  # Primary DNS server
          - 172.31.254.1   # Secondary DNS server
      routes:
        - to: "default"
          via: "192.168.199.1"  # Your default gateway
Configuration Parameters:
| Parameter | Description | Example |
|---|---|---|
| dhcp4 | Disable DHCP for static IP | false |
| addresses | Static IP address with CIDR notation | 192.168.199.10/24 |
| nameservers.search | DNS search domain(s) | mydomain.local |
| nameservers.addresses | DNS server IP addresses | 172.31.254.15 |
| routes.via | Default gateway IP address | 192.168.199.1 |
Note: The
match: name: "en*"pattern is preserved, so this static configuration will automatically apply to the detected Ethernet interface without needing to specify the exact interface name.
Apply and Verify Configuration
- Apply the configuration:
sudo netplan apply- Verify the static IP is assigned:
ip address- Verify connectivity:
# Test DNS resolution
nslookup cyberoptix.io

# Test internet connectivity
ping -c 4 8.8.8.8
Step 5: Update Hostname (Optional)
Change the hostname to match your naming convention:
# Set the hostname
sudo hostnamectl set-hostname cyberoptix-scanner-01

# Update /etc/hosts
sudo vim /etc/hosts
Add the following line to /etc/hosts:
127.0.1.1 cyberoptix-scanner-01Verify the change:
hostname
hostname -f
Security Configuration
Change Default Password
Immediately change the default password after first login:
passwdFollow the prompts to set a strong password that meets your organization's password policy.
Password Requirements:
- Minimum 12 characters
- Mix of uppercase, lowercase, numbers, and symbols
- Not based on dictionary words or predictable patterns
- Unique to this appliance
Configure SSH Access
Enable SSH Key Authentication (Recommended):
- Generate SSH key pair on your management workstation (if not already done):
ssh-keygen -t ed25519 -C "cyberoptix-scanner-01"- Copy the public key to the appliance:
ssh-copy-id ubuntu@<appliance-ip>- Disable password authentication:
sudo vim /etc/ssh/sshd_configSet the following parameters:
PasswordAuthentication no
PermitRootLogin no
PubkeyAuthentication yes- Restart SSH service:
sudo systemctl restart sshdEnable Automatic Security Updates
Enable unattended security updates:
sudo apt update
sudo apt install unattended-upgrades
sudo dpkg-reconfigure -plow unattended-upgrades
Resource Sizing Guidelines
Scaling Based on Workload
| Scan Targets | vCPU | Memory | Storage | Notes |
|---|---|---|---|---|
| < 500 IPs | 2 | 8 GB | 100 GB | Development, small deployments |
| 500 - 2,000 IPs | 4 | 16 GB | 120 GB | Standard production |
| 2,000 - 5,000 IPs | 8 | 32 GB | 150 GB | Large production |
| > 5,000 IPs | 16 | 64 GB | 200 GB | Enterprise deployments |
Storage Considerations
Storage Growth Factors:
- Scan result caching
- Log files and system logs
- OS updates and package cache
- Temporary scan data
Storage Monitoring:
# Check disk usage
df -h

# Check largest directories
sudo du -h --max-depth=1 / | sort -hr | head -20

# Monitor in real-time
watch -n 5 'df -h'
Storage Expansion:
If additional storage is needed:
- Power off the VM
- Edit VM settings in vSphere
- Increase disk size
- Power on the VM
- Expand the filesystem:
# Check current layout
lsblk

# Expand partition (replace /dev/sda with your device)
sudo growpart /dev/sda 1

# Resize filesystem
sudo resize2fs /dev/sda1

# Verify
df -h
Monitoring & Troubleshooting
Health Checks
System Health:
# CPU usage
top -bn1 | head -20

# Memory usage
free -h

# Disk I/O
iostat -x 1 5

# Network connectivity
ping -c 4 cyberoptix.io
Log Files:
| Log File | Purpose |
|---|---|
| /var/log/syslog | System logs |
| /var/log/cyberoptix/scanner.log | Scanner application logs |
| /var/log/cyberoptix/collector.log | Collector application logs |
| /var/log/auth.log | Authentication logs |
View logs:
# Real-time system log
sudo tail -f /var/log/syslog

# Scanner logs
sudo tail -f /var/log/cyberoptix/scanner.log

# Authentication attempts
sudo tail -f /var/log/auth.log
Common Issues
Issue: No IP address assigned
Symptoms: Interface shows no IP address after deployment
Resolution:
- Verify DHCP is available on network
- Check VMware network adapter is connected
- Verify network interface name in Netplan configuration
- Check for conflicting Netplan configuration files
# List all Netplan files
ls -la /etc/netplan/

# Test Netplan configuration
sudo netplan try

# Generate verbose output
sudo netplan --debug apply
Issue: Cannot reach CyberOptix platform
Symptoms: Scanner fails to connect to platform
Resolution:
- Verify DNS resolution:
nslookup api.cyberoptix.io- Test HTTPS connectivity:
curl -v https://{PLATFORM_NAME}-api.cyberoptix.io/api/status- Check routing:
ip route
traceroute api.cyberoptix.io- Verify firewall rules:
sudo ufw status verboseIssue: Low disk space
Symptoms: Scanner fails or performance degrades
Resolution:
# Check disk usage
df -h

# Find large files
sudo find / -type f -size +100M -exec ls -lh {} \;

# Clean package cache
sudo apt clean
sudo apt autoclean

# Clean old logs
sudo journalctl --vacuum-time=7d

# Remove old scan data (if safe)
sudo rm -rf /var/cache/cyberoptix/scans/old/*
Issue: VMware Tools not running
Symptoms: Cannot get VM IP in vCenter, limited guest operations
Resolution:
# Check VMware Tools status
sudo systemctl status vmtoolsd

# Reinstall open-vm-tools
sudo apt update
sudo apt install --reinstall open-vm-tools

# Restart service
sudo systemctl restart vmtoolsd
Performance Optimization
CPU Optimization:
- Enable CPU reservations for guaranteed performance
- Configure CPU affinity if needed
- Monitor CPU ready time in vSphere
Memory Optimization:
- Set memory reservation equal to allocated memory
- Disable memory ballooning for consistent performance
- Monitor memory swapping
Network Optimization:
- Use VMXNET3 adapter (already configured in OVA)
- Enable Jumbo Frames if supported by infrastructure
- Configure network I/O control for QoS
Storage Optimization:
- Use SSD-backed datastores for best performance
- Enable Storage I/O Control
- Monitor storage latency in vSphere
VMware Best Practices
High Availability
DRS (Distributed Resource Scheduler):
- Enable DRS automation for automatic load balancing
- Set VM/Host affinity rules if needed
- Configure appropriate DRS migration threshold
HA (High Availability):
- Enable vSphere HA for automatic VM restart
- Set VM restart priority to medium or high
- Configure monitoring sensitivity
Backup and Recovery:
- Schedule regular VM backups using vSphere Data Protection or third-party tools
- Test recovery procedures periodically
- Document recovery time objectives (RTO)
Resource Management
Resource Pools:
- Create dedicated resource pool for CyberOptix appliances
- Set appropriate shares and limits
- Monitor resource contention
Datastores:
- Avoid overprovisioning storage
- Monitor datastore capacity and latency
- Use Storage DRS for automated management
Network Management
Port Groups:
- Use dedicated port groups for scanner traffic
- Configure VLANs appropriately
- Document network dependencies
Security:
- Enable port-level security features (promiscuous mode rejection, MAC address changes, forged transmits)
- Use private VLANs where appropriate
- Implement network segmentation
Multi-Appliance Deployment
For large-scale deployments with multiple scanners:
Planning
-
Determine scanner placement:
- Geographic distribution
- Network segmentation requirements
- Scan zone coverage
-
Calculate resource requirements:
- Total scan targets across all zones
- Concurrent scan capacity needed
- Network bandwidth considerations
-
Define naming convention:
- Example:
cyberoptix-scanner-[location]-[number] - Document in asset management system
- Example:
Automation
PowerCLI Deployment Script:
# Example PowerCLI script for bulk deployment
$ovaUrl = "https://cyberoptix-scanners.s3.us-east-1.amazonaws.com/ova/latest/optix-appliance-1749594109.ova"
$vmNames = @("cyberoptix-scanner-01", "cyberoptix-scanner-02", "cyberoptix-scanner-03")
$cluster = "Production-Cluster"
$datastore = "Datastore-01"
$network = "VM-Network"

foreach ($vmName in $vmNames) {
    Import-VApp -Source $ovaUrl -Name $vmName `
        -Location $cluster -Datastore $datastore `
        -DiskStorageFormat Thin -Network $network
}
Configuration Management
Consider using configuration management tools for consistent deployment:
- Ansible - Automate post-deployment configuration
- Terraform - Infrastructure as code for VM deployment
- vRealize Automation - Enterprise orchestration
Next Steps
After deploying and configuring the OVA appliance:
- Complete appliance configuration using the scanner configuration guide
- Link appliance to scanner group with the provided link command
- Assign scanner group to zones for automated scanning
- Configure scan schedules and blackout dates
- Set up monitoring and alerting for appliance health
- Document the deployment in your asset management system
Additional Resources
Updated 7 months ago